Sunday, February 27, 2011

All Things Vintage

I discovered a couple years ago that I really enjoy scrapbooking with a vintage theme to my pages.  I bought a book about vintage scrapping and I was hooked.  So I began the hunt for old pictures.  At first, I just looked at my picture and the paper I'd chosen.  I was lost.  I looked again at examples in the book.  I began to notice a very common theme...layering.  Layering of all kinds, papers, textures, just anything.  So I opened my embellies drawers and began to pull out first this and then that.  I would lay them on my paper, arranging and rearranging.  When I finally got something I was happy with, I began to attach it to my paper.  Pleased with the final outcome, searched for more pictures that fit the vintage feel.  Here are some of my vintage pages that I truly love.


My first attempt was of my grandmother.  I used a stamp with the word "Cherish", because I do cherish her, a 3-D sticker with the word "Inspire" on it because she is truly an inspiration.  A shoe sticker and some very blingy (is that a word?) trim because my grandma was always a very fashion conscious person, she loved her shoes and clothes.  A "m" tag, because her first name begins with M.  I framed her picture in some vintage looking cardstock and then I used sandpaper and ink to age the frame.


This is a picture I did of my grandparents along with the account of their marriage that appeared in the newspaper.  I used an embellie which looked like an old postcard which I ran through the cuttlebug and embossed to make it look like script.  A little ink rubbed on it and "tada" aged!!  A little postage stamp with a "5" on it near the bottom of their picture signifies they had 5 children.


This page includes a picture of my great-grandmother, my sister and me celebrating out January birthdays together.  I was able to copy her handwriting from a letter my mother had.  Made a lollipop flower attached to a coffee sticker (because she always fixed us coffee with lots of milk when we visited her house)  A tag stamped with the word "memories" was perfect for some journaling of my childhood memories.  My great-grandma lived to be 103.


And this is me, 2 months old!  Also among one of my earlier attempts at vintage.  Yikes!  Not sure I like referring to myself as "vintage".  LOL  The bib was made with a round scallop punch.  I then took a 1" circle punch and cut out the neck hole, added some ties and I came up with a bib for my layout.  I tore out a piece of paper with the city name where I was born and added the "56" on the tag to indicate my birth year.

If you have not yet tried any vintage scrapping, I hope you will try it.  I think layering and more layering is the key to making your page look antique like.


Saturday, February 26, 2011

Baby Albums for Gifts

As a new mom, time just flies by.  24 hours passes and you wonder "What did I accomplish on this day?"...Diapers, feedings...feedings, diapers...wipe up spills, wipe a snotty nose or two and on and on and on.  Who has time to take pictures?  Or better yet, who has time to get that picture out of the camera, much less time to put in an album.  Those thoughts were my inspiration for an album I made recently for a new mother.  A page for each month of the year so she could quickly document the baby's growth month by month without a lot of hassle.  So, today, I wanted to share some pics of the album with you.

 Miss January (baby was born in Jan.), Feb.  Using Cricut cuts for letters and diecuts.
 March, April....for the March page I ran some fiber the length of the page and then tied snippets of ribbon and fiber around it to mimic a kite tail.
 May, June..loved that baby buggy from Cricut cart.  I used little tiny buttons for the middle of wheel spokes.
 July, August...gotta' love those sunglasses from Cricut
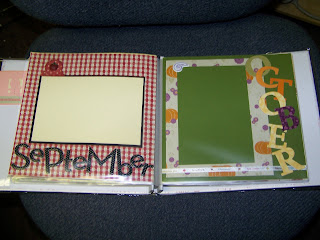
 September, October..I was trying to use things I already had in my stash and the puffy letters for Sept. is a mixture of upper and lower case.  I wasn't sure at first but I liked the way it looked when I finished it.
 November, December..pumpkin and rocking horse also from Cricut.
 After I did a page for each month, there were pages leftover in my album so i decided to just include a few fun things, such as "My Mommy" and "Daddy Duty" page.  The page corners were cut from a paper pack by Paper Studio called "Sweet Pea".  It's everything baby in that paper pack...love it!!
 A family page and a page to document new things baby is learning in the first year.
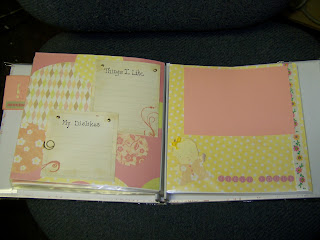
 A page for likes and dislikes and a page for that first tooth picture.
The last page is for listing story books baby enjoys.  I loved the diecuts from "Graphically Speaking" Cricut cart. 

I also stamped the back of the album with a new stamp I found from Stampablities at Hobby Lobby.  It says "Inspired by Life..Crafted by Hand".  In the middle of circle it says "One-of-a-kind-Art Created By" and then a line for your name.

Hope I've inspired you to do some more scrapping real soon.
(Sorry for the glare on some of the pictures.  I was in a hurry and didn't take them out of the page protectors.)

Thursday, February 24, 2011

Good Bye Winter, Hello Spring


Winter it is time for you to go to bed,
You sleepy, sleepy head.

Spring's about to wake up
Promising daffodils and creamy buttercups.

Winter  take with you your cold winds and snow,
Let Spring breezes take their turn to blow.

Sunday, February 20, 2011

A Poem for My Loved Ones

For You, I Pray


I've stood where you are standing today,
I've prayed the same kind of prayers you're praying today.

To say good-bye to the ones we love so
Can be so hard, Believe me I know.

 As her spirit soars
And you are left behind,

May the same arms that carry her away from this pain,
Circle you in love, Carrying you through your pain.

I've stood where you are standing today,
And I'm praying with you today.


For my loved ones in Louisville, KY, who are preparing to say good-bye to their loved one.


And the Winner Is.........

True Random Number Generator 5

CHRISTY!!!!!!!!!!  Congrats!  Send me your addy and I will get the album in the mail to you ASAP.

Thank you to all who have chosen to follow my blog and participated in my first ever give away.  Stay tuned, I hope to have more.

Saturday, February 19, 2011

Time Well Spent

What a fun weekend!  I went to a sleepover..yes I said a sleepover.  LOL  I know you think I'm too old for that, right?  Well, I did it anyway.  My two sisters and a cousin came to town and we partied Friday night away at my mom's house.  I'm thinking I may be too matured for nights lasting past 2a.m. but it sure was fun.  Lots of pizza, snacking, games, looking through old photos, chatting till the wee hours and howling laughter.  Time with family equals time well spent.  Making more memories to deposit in our memory banks.

Just two more comments and we will have the album give away.  WooHoo!!!!!!!!!!!

Monday, February 14, 2011

My Valentine

Here are pics of my sweetie's Valentine I made for him this year.  I followed a tutorial on Tim Holtz's blog.  This little booklet uses only one sheet of 12X12 paper.


I used double-sided paper from K&Company "Life's Journey" paper pack.  The little square embellies was a sheet of paper in the stack that I cut apart and matted.  I used Tim Holtz tissue paper tape for the binding and edges of the paper, also some other of his embellies were used throughout the book.  This little book winds up having 3 pockets so I used those for tags to put personal love notes on to my Valentine.
Here's the link for Tim's blog:
http://timholtz.typepad.com/my_weblog/

What a Day!!

Happy Valentine's Day to all of you!

What a weekend it has been for our family!  We found out Friday night that our son and his wife are expecting a baby.  Not only that, but they've kept it a secret for a long time.  Our 3rd little granddaughter is due to arrive on June 25.  We are going from one granddaughter this past Christmas to 3 little granddaughters this next Christmas.  What fun that will be!!!  This, no doubt, is the very best Valentine's Day ever and I'm sure my husband would agree.  He is absolutely over the moon....again!!!

Speaking of husband, Happy Valentine's Day, sweetheart.  You are my very best friend and I love you so much.

My husband, my high school sweetheart, has always been the best.  We were married a few months after I graduated high school (oh I would've had a fit if one of my kids had done that...lol, times have changed).  I guess you could say we kind of grew up together.  A lot of maturing had to take place those first few years but we made it.  We entered into our marriage knowing it would work because we would make it work.  I actually heard a young woman several years ago make the comment that she was getting married but if it didn't work no big deal they'd just get divorced.  How sad to enter into your marriage commitment so lightly.  We have had a wonderful 36 years together and I have never regretted my decision.  We've learned a lot along the way.  It's been a wonderful journey thus far. 

Hope everyone has a wonderful day!

Sunday, February 13, 2011

Saturday, February 12, 2011

Here At Last-Give Away!!

Finally, my first blog give away.  I made a mini album for you.  Following are a few pics to give you an idea of what it is like.  For those of you who are not scrapbookers, mini albums are pretty popular in the scrapbooking world.  They come in many different shapes and sizes.  Most are perfect for carrying in a bag or just to sit on your bedside table.  With Spring around the corner and most of us good and ready for it, I used that as my inspiration....lots of flowers and bright colors.  There  are pages for attaching pictures and pockets for extras.  You could also just use if for journaling.  Just have fun with it.

In order to enter this random drawing, you must be a follower of my blog.  You can do this by clicking the "follow" button on the right side of my page.  I will wait for the drawing until I receive 15  comments on this post so pass the word around,

Here are some pics:


I used "K & Company Handmade Specialty Paper" pack for this project.  Plus a variety of embellies were  used including Tim Holtz corner protectors on the front cover.


Friday, February 11, 2011

The Give Away Album

Remember, when I hit 25 followers, I was having my first give away?  Well, I have been working on the album.  Wasn't happy with it at first but I've been plugging along and well, I'm posting it tomorrow for you to take a peak.  In order to enter the random drawing, you need to be a follower of my blog (you can do so on the right-hand side of blog page) and you must leave a comment after I post the album.  I'll have the drawing once we reach 15 comments (1 per person).  So be on the lookout tomorrow.

Happy Friday!!

Thursday, February 10, 2011

Mind Your Manners, Sweetie

How many times did we hear "mind your manners" when we were growing up?  As a small child, we were taught to say "please, thank you, pardon me (or part of me as my little granddaughter says) and other such niceties.  As an adult, don't you appreciate when a child or young person says "excuse me" or holds the door open for you?  Something seems right with the world when you see someone minding their manners.  I automatically think "good job mom and dad".  When you are old enough, you are taught how to answer the phone and all the etiquette that entails.  But then......along came the cell phone.  What is proper politeness when a cell phone is involved?  You see them everywhere.  Did you ever sit at a stop light and just watch as cars go through the intersection and see all the people with a phone in their ear?  Did you see a few weeks ago the news story about the gal who was texting as she walked through a mall and fell right into a fountain?  Funny, right?  But it just goes to show what a hurry, scurry world we live in.  Too much multi-tasking going on.  In his sermon Sunday, our pastor shared a story about an experiment our youth pastor tried.  He sent out a mass text during a Sunday service to the youth group.  He received 13 responses to that text.  What do you think those teens were getting out of church that Sunday?  I had to chuckle but then I thought maybe it is time to rethink our cell phone usage.  Don't get me wrong.  I have one and I have used it while in the car.  I just think there are some places we could stand to just shut them off out of pure politeness.  Just something to think about today.

I'd love a blog hug from you today!

Wednesday, February 9, 2011

Simply Sweet Treats II

Okay, I have another easy-to-fix treat for your Valentine's Day preparations.  This is a great one to lay on a co-workers desk or just a little something to add to your sweetie's lunch.  Just something to say "You Are Special to My Life".  I tried to take step-by-step pictures for you.  I hope they are understandable.

You will need some cardstock, ribbon, hole puncher, scissors, a candy bar and then whatever you choose to decorate your little package.  Here goes:

Lay your candy bar onto your piece of cardstock.  Cut it so you have about 1/2 inch on the top and bottom of your candy and enough width to wrap around the bar and tape.


Now you will want to use double stick tape for the bottom and one side of your pouch.

Then take your hole punch and put a hole in the top of your little candy pouch.


Next, take the ribbon you've chosen for your project, fold it in half, laying your candy bar in it. (I cut my ribbon doubled about 3 times the length of my candy bar)


This picture is showing the back of the pouch.  After you have placed the ribbon around your candy bar then slip the bar into the pouch.  Thread one end of the ribbon in the hole you punched in the front and thread one in the back hole.

Tie a pretty bow at the top.  I was in a bit of a hurry so I need to go back and work on my bow.

For decorating the front of the pouch, I cut a heart at 2 inches from the Lyrical Letters Cricut Cartridge. (it is really pink)  I then laced a ribbon around the heart.  After lacing was complete, I tied a bow at the bottom of the heart.

I then cut from pink cardstock with a white shadow, the word "indulge" from the Graphically Speaking Cricut Cart at 1 inch.  Glued the heart and word on the front of the pouch and there you have it.  A cute little pouch for your candy bar surprise.  Untie the ribbon, gently pull and out will come the candy bar.  Enjoy!

FYI for my Scrappy Friends

Hey, if you are scrappy and you own a cricut, you may want to hurry over to www.cricutmachine.com. They have a 48 hour sale going on, 50 carts for $15.95 each.  Great time to get that favorite cart you've been wanting.  Just wanted to give you a heads up on that sale.  I think today is the last day so don't delay.

Tuesday, February 8, 2011

Be My Valentine II

Ready for another Valentine idea?  This card is really easy so don't be fooled at first glance.  I will include a link which contains written instructions and very good pictures, step by step.  If you follow the directions, you cannot fail!!


I used cardstock for the base of the card and then decorated with printed paper.  The card insert has a cricut cut heart o the top.  The words and scrolly at the top are rub-ons.  The heart on the bottom was stamped.  Since this card was for my sweetie, I used the gray/black so it wouldn't look too feminine.  I've also used this card for a birthday card.  Once you have the basic card folded, embellishing is up to your personal style.  Give it a try for someone special in your life.  Here is the link:

http://www.splitcoaststampers.com/resources/tutorials/criss_cross_card/

PS....I am still working on the give away album.  I haven't forgotten!!


Monday, February 7, 2011

Simply Sweet Treats

Last year I attended a 12 hour scrapping crop.  Yes I said 12 hour!  If you are not familiar with a crop, it is where a bunch of ladies gather, each dragging (literally, dragging, some of them) their scrapping supplies and we work on our scrapbook projects all day long.  It is great fun.  You get to see others' work, share ideas and even get a chance to visit vendor tables and do make 'n take projects using their products.  One of the cute little projects I did last year at the "Close To My Heart" table would make a cute little treat to pack in a lunchbox on Valentine's Day or would make an easy party favor.


As you can see, this project just uses a rectangle piece of cardstock cut slightly larger than a stick of gum.  Use double sided tape to stick gum to the rectangle.  I used a scalloped punch, then a circle punch for the sentiment on the front and then the back is just stamped with "Happy Valentine's Day".  Thanks to the "Close To My Heart" ladies for such a simple sweet treat.

Sunday, February 6, 2011

Be My Valentine

I guess the countdown for Valentine's Day begins with this week.  Time to be thinking what special Valentine you will get your sweetie.  A couple years ago I entered a challenge in one of my crafting groups on Cafemom.  The challenge:  you would receive an item in the mail and your challenge was to alter it in some way.  In a couple weeks, I received this little, tiny tin in the mail.  I looked at that thing and thought "What on earth?"  Let's see, it would hold about two mints..nah.  Maybe five paperclips for the desk...nah.  Then it came to me, a Valentine!!  What? you say.  Yep, I decided to go to work and turn it into my Valentine that year.  It was a treasured Valentine to him and he loved it.  He carried that thing around for the longest time.  I'd see him now and then getting it out of his console to show someone.  Here are some pics for you.


The little round circles fold up accordion style and then fit right into the tin.  I used song titles from our wedding on some of the circles and reduced a couple pics of us for the others.  It was a fun challenge. (oh, and by the way, I won that challenge)  Sometimes to rise above a challenge, we have to think outside the box!